How To Get Android Mounts and Partition Images

In this guide I will be showing you how to get the android mounts and partition images. There could be many reasons for needing the android mounts and partition images. A couple reasons that come to mind could be to make backups of your partitions in case you need to fix your phone from a bad flash later on. Or you might want to customize a boot.img or system.img to add in some custom features. Whatever your reason, just follow the guide and you’ll be pulling those partitions in no time.
Requirements:
- A rooted android phone
- ADB installed on your linux PC. Here is a guide to install ADB if you haven’t already.
Getting Android Mounts
Enable USB debugging in Developer options in your android phone. Then plug it to your PC with the usb cable.
Now open a terminal on your PC and enter the following command…
adb devicesIf all went well you should see your phones’ serial number listed in the terminal.
Next enter the following command…
adb shellThe next command is to gain root access which we will need. Make sure your phone’s screen is on and unlocked before entering the next command. Once you enter the command you will get a prompt on your phone asking for root permission. Make sure to allow it…
suNow we will get the mounts with the following command…
cat /proc/mountsYou should now see a long output in your terminal similar to the one below. I have highlighted the path for the /system mount point path. The path for your device might be a little different which is ok. As you can see, all the mounts use the same path. Copy this path from your terminal so we can use it in the next step.
/dev/block/platform/msm_sdcc.1/by-name/system
/dev/block/platform/msm_sdcc.1/by-name/system /system ext4 ro,seclabel,relatime,errors=panic,data=ordered 0 0
/dev/block/platform/msm_sdcc.1/by-name/userdata /data ext4 rw,seclabel,nosuid,nodev,noatime,noauto_da_alloc,errors=continue,commit=20,data=ordered 0 0
/dev/block/platform/msm_sdcc.1/by-name/cache /cache ext4 rw,seclabel,nosuid,nodev,noatime,noauto_da_alloc,errors=continue,commit=20,data=ordered 0 0
Getting Partitions
In this next step we will use the path we copied from the previous step to enter the following command to retrieve all the partitions…
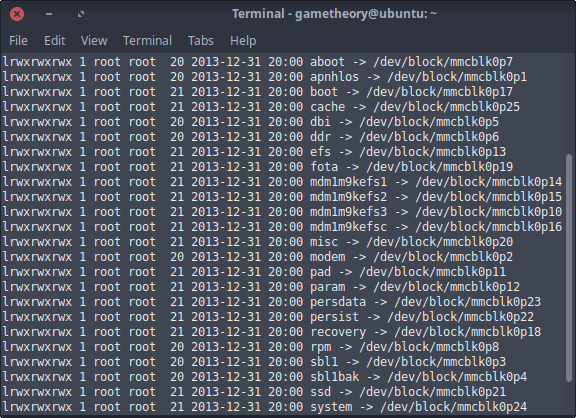
ls -al /dev/block/platform/msm_sdcc.1/by-nameYour output from the above command should look like the following with all the partitions labeled by name. I highlighted the boot partition path so that we can pull the boot.img in the next step…
/dev/block/mmcblk0p17
lrwxrwxrwx 1 root root  20 2013-12-31 20:00 aboot -> /dev/block/mmcblk0p7
lrwxrwxrwx 1 root root  21 2013-12-31 20:00 boot -> /dev/block/mmcblk0p17
lrwxrwxrwx 1 root root  20 2013-12-31 20:00 modem -> /dev/block/mmcblk0p2
lrwxrwxrwx 1 root root  21 2013-12-31 20:00 recovery -> /dev/block/mmcblk0p18
lrwxrwxrwx 1 root root  21 2013-12-31 20:00 system -> /dev/block/mmcblk0p24
Pulling Partition Images
Now that we know our boot partition path we can use it in the next command to copy the boot.img to our internal SD on our android phone…
dd if=/dev/block/mmcblk0p17 of=/sdcard/boot.imgWith the above command we have now copied the boot.img to our internal SD. You can now drag and drop the boot.img from your phone’s internal SD to your PC. Alternatively you can use the following command to pull the boot.img from the internal SD to your PC’s desktop.
If you are still in the adb root shell then enter the following 2 commands in terminal to exit root shell and adb. If you have already exited you can skip this step…
exit
exit
To copy the boot.img from your phone’s internal SD to your desktop enter the following command…
adb pull /sdcard/boot.img $HOME/DesktopAll done! You can use this guide to get any partition image you wish (ie. boot.img, recovery.img, system.img, etc).
This concludes the guide. You have now learned how to find your mounts, partitions, and pull your partition images from your android phone. Enjoy!
Tags: android, tutorials, linux