Android Toolbar


Often times users are looking to create an Android Toolbar so they can customize it to their liking. In this tutorial we’ll go over how to create an Android custom Toolbar and show you a few modifications you can do to the Toolbar for your app.
The code in this tutorial will be in the full project on github linked at the bottom of this page. Feel free to fork or download the project from github. So lets get started.
Android Toolbar Example Tutorial
Begin by creating a new project in Android Studio with an Empty Activity if you haven’t already. We can call the project “Android Toolbar”.
In order to create an android toolbar you must change the base theme in your “styles.xml” to one with “NoActionBar”. Lets also add “Title” and “SubTitle” elements to our “styles.xml”. I have left some items commented out that you can uncomment if you wish to use them.
styles.xml
<resources>
  <!-- Base application theme. -->
  <style name="AppTheme" parent="Theme.AppCompat.NoActionBar">
    <item name="colorPrimary">@color/colorPrimary</item>
    <item name="colorPrimaryDark">@color/colorPrimaryDark</item>
    <item name="colorAccent">@color/colorAccent</item>
  </style>

  <style name="toolbarTitle">
    <item name="android:textColor">#FFFFFF</item>
    <!--<item name="android:textSize">18sp</item>-->
    <!--<item name="android:textStyle">bold</item>-->
  </style>

  <style name="toolbarSubTitle">
      <item name="android:textColor">#FFFFFF</item>
      <!--<item name="android:textSize">14sp</item>-->
      <!--<item name="android:textStyle">bold</item>-->
  </style>
</resources>
Right click on your “layout” directory and create a new Layout resource file called “toolbar.xml”. This will be our Toolbar layout that we will reference from any activity layout where we’ll want to have a Toolbar.
toolbar.xml
<?xml version="1.0" encoding="utf-8"?>
<androidx.appcompat.widget.Toolbar
    xmlns:android="http://schemas.android.com/apk/res/android"
    android:id="@+id/myToolbar"
    android:layout_height="?attr/actionBarSize"
    android:layout_width="match_parent"
    android:minHeight="?attr/actionBarSize"
    android:background="?attr/colorPrimary" />
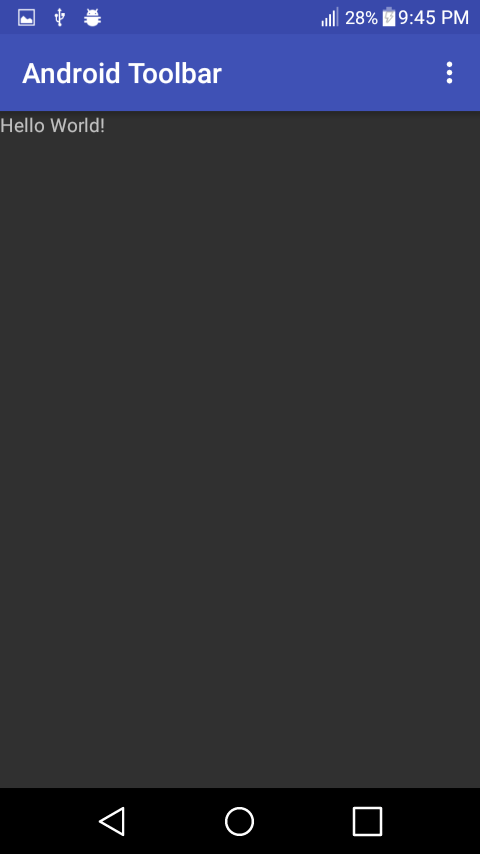
Next we will add the Toolbar to our “MainActivity.java” class. Create the toolBar() method where we will enable any features we would like for our Toolbar. We then reference the toolBar() method from the onCreate() method. I have left some items commented out that you can uncomment if you wish to use them.
MainActivity.java
public class MainActivity extends AppCompatActivity {

  @Override
  protected void onCreate(Bundle savedInstanceState) {
      super.onCreate(savedInstanceState);
      setContentView(R.layout.activity_main);

      // Adds the Toolbar to our MainActivity.
      toolBar();
  }

  // Our Toolbar
  private void toolBar() {
      Toolbar tb = findViewById(R.id.myToolbar);
      tb.setTitle("Android Toolbar");
      // tb.setTitleTextAppearance(this, R.style.toolbarTitle);
      // tb.setSubtitle("My SubTitle");
      // tb.setSubtitleTextAppearance(this, R.style.toolbarSubTitle);
      // tb.setContentInsetsAbsolute(0, 54); // Best used when setting a Logo
      // tb.setContentInsetsRelative(0, 54); // Best used when setting a Logo
      // tb.setLogo(R.mipmap.ic_launcher);
      setSupportActionBar(tb);
      if (getSupportActionBar() != null) {
          // This sets a shadow underneath the Toolbar
          getSupportActionBar().setElevation(8);
      }
  }
}
Now open the “activity_main.xml” file in your layout directory and add the Toolbar layout as the first element at the top. Here’s what the Toolbar element should look like…
<include layout="@layout/toolbar" />This is what our “activity_main.xml” file should look like…
activity_main.xml
<?xml version="1.0" encoding="utf-8"?>
<LinearLayout xmlns:android="http://schemas.android.com/apk/res/android"
    xmlns:tools="http://schemas.android.com/tools"
    android:orientation="vertical"
    android:layout_width="match_parent"
    android:layout_height="match_parent"
    tools:context=".MainActivity">

    <include layout="@layout/toolbar" />

    <TextView
        android:layout_width="wrap_content"
        android:layout_height="wrap_content"
        android:textSize="30sp"
        android:text="@string/hello_world" />
</LinearLayout>
Keep in mind that your “activity_main.xml” can be any layout you wish like for example it can be a RelativeLayout, ConstraintLayout, or any other layout you may need. You will always have to include your Toolbar as the first element of the layout unless you wish to have the Toolbar at a different location in your layout.
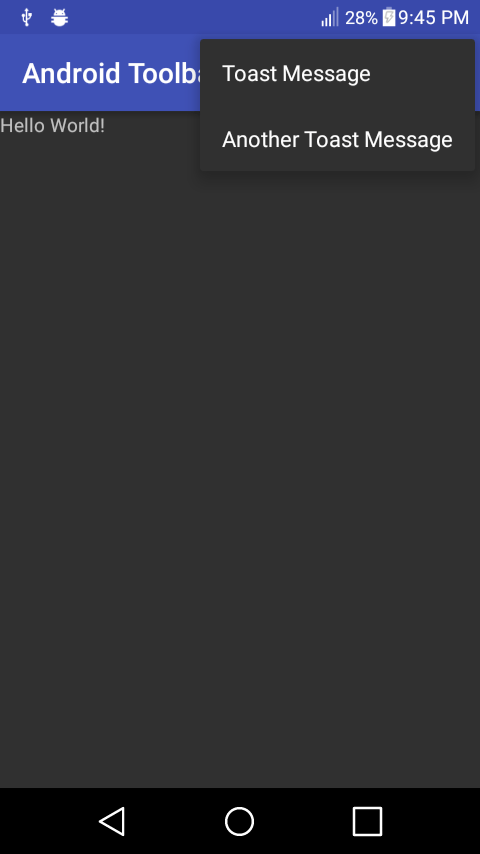
We can now add some functionality to our Android Toolbar by adding an Overflow menu on the right side of the Toolbar. The Overflow menu is perfect for things like app settings, change log, and many other uses. So first open your “strings.xml” file in your “values” directory and add the following strings that we’ll need for our menu.
strings.xml
<resources>
  <string name="app_name">Android Toolbar</string>
  <string name="toast_message">Toast Message</string>
  <string name="another_toast_message">Another Toast Message</string>
  <string name="hello_world">Hello World!</string>
</resources>
Now right click on the “res” directory and create a new Directory called “menu”. Then right click on the new “menu” directory and create a new Menu resource file called “menu.xml”. You should now have a “menu.xml” file inside a new directory called “menu”. Now edit the file so that it looks as follows…
menu.xml
<?xml version="1.0" encoding="utf-8"?>
<menu xmlns:android="http://schemas.android.com/apk/res/android"
  xmlns:app="http://schemas.android.com/apk/res-auto">

  <item
    android:id="@+id/myMessage"
    android:title="@string/toast_message"
    app:showAsAction="never" />

  <item
    android:id="@+id/anotherMessage"
    android:title="@string/another_toast_message"
    app:showAsAction="never" />
</menu>
The final step is to add the menu and our menu items to our “MainActivity.java” class. Here we add a couple of Toast messages just to give you the right idea.
MainActivity.java
package com.androidtoolbar;

import androidx.appcompat.app.AppCompatActivity;
import androidx.appcompat.widget.Toolbar;

import android.os.Bundle;
import android.view.Menu;
import android.view.MenuItem;
import android.widget.Toast;

public class MainActivity extends AppCompatActivity {

    @Override
    protected void onCreate(Bundle savedInstanceState) {
        super.onCreate(savedInstanceState);
        setContentView(R.layout.activity_main);

        // Adds the Toolbar to our MainActivity.
        toolBar();
    }

    // Our Toolbar
    private void toolBar() {
        Toolbar tb = findViewById(R.id.myToolbar);
        tb.setTitle("Android Toolbar");
        // tb.setTitleTextAppearance(this, R.style.toolbarTitle);
        // tb.setSubtitle("My SubTitle");
        // tb.setSubtitleTextAppearance(this, R.style.toolbarSubTitle);
        // tb.setContentInsetsAbsolute(0, 54); // Best used when setting a Logo
        // tb.setContentInsetsRelative(0, 54); // Best used when setting a Logo
        // tb.setLogo(R.mipmap.ic_launcher);
        setSupportActionBar(tb);
        if (getSupportActionBar() != null) {
            // This sets a shadow underneath the Toolbar
            getSupportActionBar().setElevation(8);
        }
    }

    @Override
    public boolean onCreateOptionsMenu(Menu menu) {
        // Lets inflate our menu/menu.xml file to display the Overflow menu on our Toolbar.
        getMenuInflater().inflate(R.menu.menu, menu);
        return true;
    }

    @Override
    public boolean onOptionsItemSelected(MenuItem item) {
        // Here we add items to our Overflow menu in our Toolbar.
        // You can add as many items as you need.
        // You can also run other methods or classes from these menu items.
        int itemId = item.getItemId();
        if (itemId == R.id.myMessage) { // This is the id of the item in our menu.xml
            Toast.makeText(getApplicationContext(), "Our Overflow menu works! Fantastic!", Toast.LENGTH_LONG).show();
            return true;
        } else if (itemId == R.id.anotherMessage) { // This is another id of an item in our menu.xml
            // This is just another toast message to give you the idea of
            // how to add multiple items to the Overflow menu.
            Toast.makeText(getApplicationContext(), "Another item in our Overflow menu! Fantastic!", Toast.LENGTH_LONG).show();
            return true;
        }
        return super.onOptionsItemSelected(item);
    }

}
This will conclude the Android custom Toolbar tutorial. The full project is on github. You can download or fork it from the link below and import it to your favorite IDE, though Android Studio is recommended.
Tags: android studio, app development, java, tutorials, android