Remove Unused Kernels Ubuntu 18.04

A question often asked… How do I remove old unused kernels from ubuntu 18.04?
Each time you receive a kernel update in your ubuntu 18.04 system updates, you end up with the old kernels remaining in your system. This can be useful in the event that the new kernel causes issues, you can always boot the old kernels. In time, old unused kernels can accumulate taking up unnecessary space on your drive.
I usually use my system for a few days with a new kernel update before removing the old kernels. This gives me time to assess whether the new kernel is stable and my system is running fine. Once I’m certain the system is stable with the new kernel, I will then proceed to remove the old kernels.
Remove Unused Kernels
It’s a good idea to view the list of installed kernels on your system to be sure that there are old kernels to remove.
You can list all the kernels on your system with the following dpkg command.
dpkg --list | egrep -i 'linux-image|linux-headers'Your output should list all the kernels installed on your system like this:

To remove the unused kernels you can run the following command:
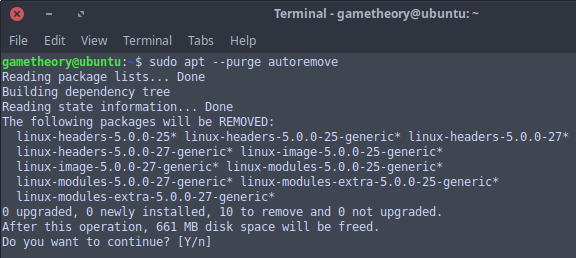
sudo apt --purge autoremoveHere’s what the output of apt looks like:

Notice in the output above that 661 megabytes of space will be freed by removing the old unused kernels from my ubuntu 18.04 system.
Conclusion
This was a brief look at how to list and remove old unused kernels from ubuntu 18.04. This can be an easy way for you to free up space on your system that you may not even be aware is being consumed.
Tags: tutorials, linux, command line